
logo corelCONCEPT originaly by nziep
CReaTIvity,DESIgn,ARTwork,COncepT VECtoR,CURve,ImaGIne,ILLUsTRaTOR ProJEct,DRAwing,TOucHING,makERz
copyright 2009. All Right Reserved
new design t-shirt by nziep. simple and easy design with corel draw


The Mac® OS X GEL look is still hot even though it was introduced quite some time ago. Creating GEL buttons has already been covered here and covered very well so I thought it would be fun to see if we could create the GEL look in text. Before we get started, however, we need to set a few common parameters. I will be using CorelDRAW® 11 and so some features may be different or may have migrated to different menus, as they often do between versions of CorelDRAW.
As I am creating this tutorial to be seen on the Web, I am going to use Corel's RGB palette, which many of you will remember was the default palette before version 7. The colors are brighter and will produce a better looking effect.
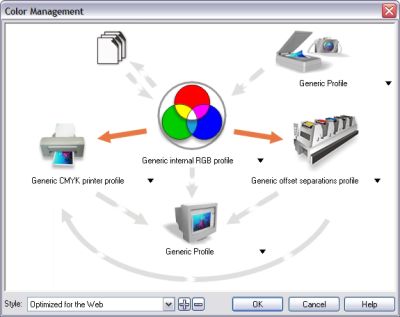
(Figure 1) In the Tools drop down menu, select Color Management… From the Style drop down list, select Optimized for the Web. This sets the color space to RGB.
(Figure 2) From the Layout menu, select Page Setup… In the Page Setup dialog, change the Resolution to 96 dpi (Windows®) or 72 dpi (Macintosh®). These two settings are screen resolution and are the proper 1:1 resolution for viewing on the Web. Even if you plan to output your image for commercial printing, use these two settings to avoid confusion. You can change the resolution before you output your files.
For this tutorial we shall create a GEL symbol for the at character (@). As CorelDRAWing this symbol is a lot harder than it looks, we'll use an Avant Garde @ symbol for a guide.
(Figure 3) Using the Text Tool, click on the page and key in @ in Avant Garde (the CorelDRAW default font). On the Property Bar, change the size to 130 and press Enter to apply the change.
(Figure 4) Press and hold the Freehand Tool to open the Curve Flyout menu. Select the Pen Tool (the fourth from the right). Click and add a series of connected lines as shown here in red. The idea is to place each anchor point in-between the outlines of the @ and to place the control points on logical points from which to create curved line segments. When you have clicked the last control point, double click to let CorelDRAW know you are finished.
(Figure 5) Select the Shape Tool. Click on the outline to select it. Marquee select all the control points by dragging a rectangle around all the points with the Shape Tool. On the Property Bar (the context-sensitive menu at the top of the screen) press the Convert Line to Curve icon. Drag a line segment and pull it like a rubber band until it more or less conforms to the shape of the @ symbol.
(Figure 6) Continue until all the line segments are now gently curves and more or less follow the shape of the @.
(Figure 7) We can fine tune the control points by adjusting the Bezier control handles. Select the outline with the Shape Tool. Click on a control point. Note that two lines with small boxes on the ends appear coming out of each side of the point. These are Bezier control handles with which we can adjust the segments of the outline. You can drag these in or out to make the curve segment longer or shorter and you can rotate them to adjust the angle of the curve segment. Experiment until you get the curve as smooth as possible. The smoothest curves will have both Bezier handles in a straight line. The angle of the handles will also be more or less parallel to the curve.
TIP: Moving the handles can be tricky and inexact if you are not real comfortable using the mouse. Zoom in close. Select a point and then use the arrow keys on your key pad to move the handles. You may also need to set the nudge amount on the Property Bar to 1px. (CorelDRAW's default idea of a nudge is sometimes closer to a shove)!
(Figure 8) You might need an extra control point at the top of the "a" shape. Double click with the Shape Tool to add the point. Continue to fine tune the shape until you have gotten it as close to the shape of the @ symbol as possible. Name and save your CorelDRAWing and take a short eye break.
(Figure 9) Delete the Avant Garde @ symbol. Select the outline. Click and hold on the Outline Tool to open the Outline Flyout. Select the Outline Pen options (the first icon). Change the line width to 16 points. Click the two middle Corner and Line Caps radio buttons to round the ends and the corners. Press OK.
With the outline still selected, select Convert Outline to Object from the Arrange menu.
(Figure 10). From the View menu, select Wireframe or Simple Wireframe. You will notice the original outline has been left behind. As we don't need it anymore, delete it. Return to the View menu and select Enhanced to return to the anti-aliased display mode.
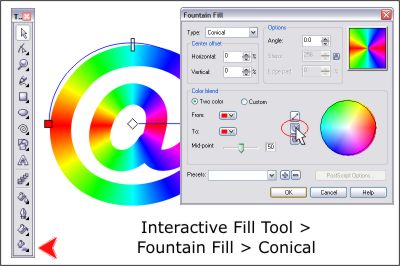
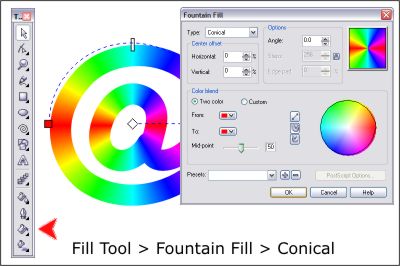
(Figure 11) Select the Interactive Fill Tool icon. From the drop down list of Fill Types on the Property Bar, select Conical. The Interactive Conical Fill controls will appear on the screen. You can drag the ends of the fill path to rotate the fill. You can also double click on the circular portion of the fill path to add more colors. For what we are going to do, just leave everything as is. Click the white box at the end of the fill path, then click the red color on the screen palette. Repeat this for the other end so you now have a red to red conical fill. To the left of the Fill Type drop down list is the Edit Fill icon. Click it to open the Fountain Fill dialog. Select the counter clockwise fill option (indicated with the red ellipse) and press OK to apply the change.

(Figure 12) Make two copies of the rainbow filled shape and set them to one side. We'll need them later on. Change the fill of the original @ to black by selecting the shape then pressing the black color on the screen palette. You can also drag and drop colors from the screen palette onto the object.
Press and hold the Interactive Tool icon to open the Interactive Tools Flyout menu. Select the Contour Tool (the nested squares). If the shape is not selected, select it with the Contour Tool. On the Property Bar press the To Center icon. Change the Contour Offset amount to 1pix.
NOTE: Your shape may have an unfortunate wedge going though it. Mine did. If yours does not then skip this part. Select the shape and from the Arrange menu, select Break Curve Apart. Now marquee select the entire shape. The status bar at the bottom of the screen will tell you how many shapes are selected. You should only have 2. If it shows more, cut the counter (the inside of the "a" shape) to the clipboard (Edit > Cut). Marquee select most of but not all of the shape. If you see a small portion selected, delete it. Paste the shape from the clipboard back onto the shape, select both and from the Arrange menu, select Combine. Your contour should now be successful.
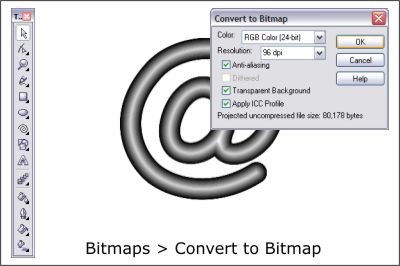
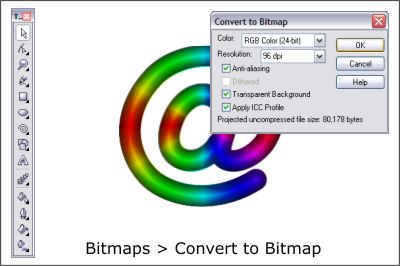
(Figure 13) Select the contour with the Pick Tool (the arrow). Open the Bitmaps menu and select Convert to Bitmap. Use the settings shown above. Press OK to create the bitmap.
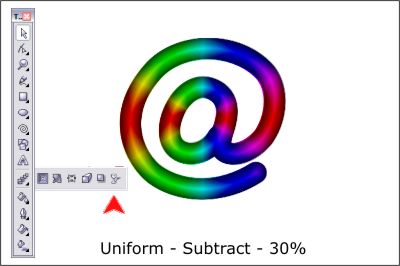
(Figure 14) Center the bitmap over the rainbow-filled @ shape. Open the Interactive Tools Flyout menu and select the Transparency Tool (the wineglass icon). From the Property Bar, select Uniform (the default) and from the Transparency Operation drop down list, select Subtract. Change the slider setting to 30%.
(Figure 15) Select both the rainbow-filled shape and the transparent bitmap. Convert these two items to bitmap (Bitmaps menu) using the settings shown).
(Figure 16) Locate one of the duplicate @ shapes which I asked you to set aside. Change the fill to white and apply a black outline. Apply a 1-step, To Inside contour with a 4pix offset amount.
From the Arrange menu, select Break Contour Group Apart. Open the Arrange menu again and select Ungroup. Delete the wider shape (shown in dashed blue line).
(Figure 17) With the shape selected, press the + key to make an in-place duplicate. Move the duplicate 12 pixels to the right and 12 pixels down.
TIP: With nothing selected, change the Nudge amount on the Property bar to 1px. Now use the arrow keys on your computer keypad to move the duplicate shape the precise amount. (You could also set the nudge amount to 12px. Just remember to set it back to a lower amount when you are done).
(Figure 18) Select both shapes and then press the Trim icon on the Property Bar. The cutter shape remains and while nothing seems to have changed, if you drag the underneath shape away, you'll see the top shape has been trimmed out of the bottom shape as shown in blue.
(Figure 19) Duplicate the whole shape by pressing the + key. Move the duplicate shape up and to the left 12 pixels in each direction.
(Figure 20) Select the trimmed out shape and cut it to the clipboard (Edit > Cut). Select the two shapes. On the Property Bar, press Back Minus Front. This is a new path command that does the same function as Trim except it removes the top, or trimmer shape. Paste the shape we just cut to the clipboard back onto the page (Edit > Paste). Save your work and take a short eye break.
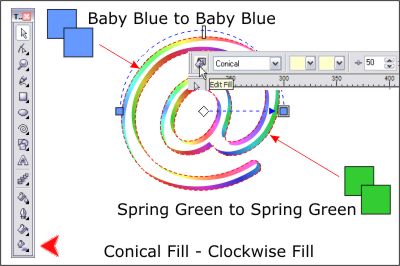
(Figure 21) Position the two cutout shapes as shown. Select the top shape and then select the Interactive Fill Tool. From the drop down menu on the Property Bar, select Conical. Make the starting and ending colors Baby Blue. Click the Edit Fill icon which is just to the left of the drop down list of Fill Types, to open the Fountain Fill dialog. Click the Clockwise Fill icon and press OK to close the dialog.
TIP: If you let the cursor rest for a moment over the color squares on the screen palette (or any of the buttons and icons), the color name, or tool or button name, will appear in a balloon under the cursor.
Select the bottom shape and repeat this step except use Spring Green for the start and end colors. The idea here is to create two rainbow gradients, one lighter and one slightly darker which we will use for highlights and reflections.
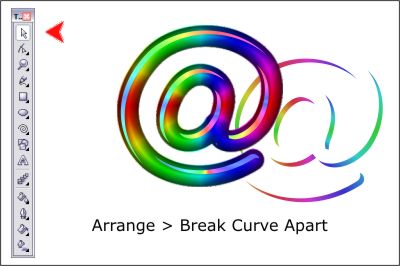
(Figure 22) Position the top highlight shape over the bitmap as shown. With the highlight shape selected, select Break Curve Apart from the Arrange menu. You will now have a series of separate shapes.
(Figure 23) Using the Freehand or the Pen Tool, CorelDRAW a single diagonal line through the bitmap image as shown. Select the top left most shape. Select the Interactive Transparency Tool and from the drop down list of Transparency Types, pick Circular. Select Add from the Transparency Operations drop down list. Drag the dashed arrow portion of the fill until the center of the circle is over the area where the diagonal line passes though the top of the @ shape. Click on the outside color, which is now white and change this to black by clicking the black square on the screen palette. Click on the inside color square and change the black to white. We have just made the center opaque and the outside transparent which is the opposite of the default setting.
NOTE: Black represents 100% transparency and white represents 0% or no transparency. You can also click the start or ending square and move the slider on the Property Bar to adjust the amount of transparency. Shades of gray represent various amounts of transparency.
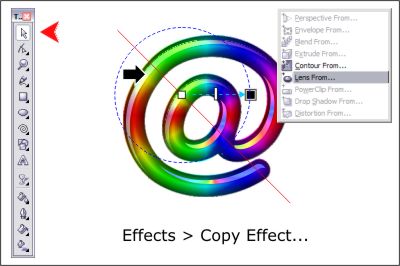
(Figure 24) Select the next shape (directly over the "a"). From the Effects menu, select Copy Effect… Lens From… A large black arrow cursor will appear. Click the first highlight shape to which you applied transparency. Adjust the transparency so the lightest portion is centered on the red diagonal line and the diameter is similar in size to the first circular transparency.
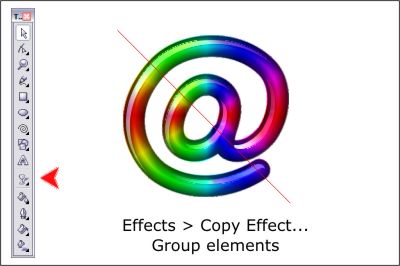
(Figure 25) Repeat this last step and copy the lens effect to the other shapes. When you are finished, select all the highlight elements and group them.
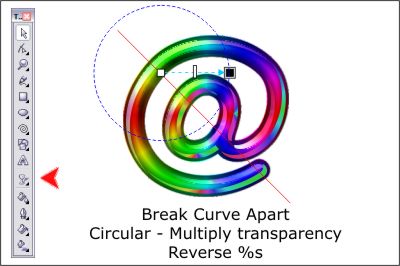
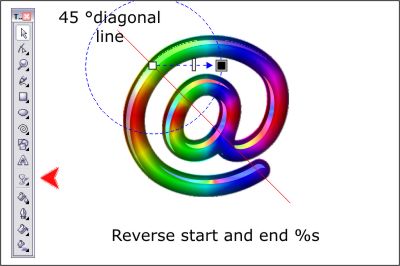
(Figure 26) Position the bottom shape, which we will call the reflection, as shown. Break the Curve Apart. Apply a Circular, Multiply transparency reversing the starting and ending transparency percentages and centering the darkest portion of the circular transparency on the red diagonal line.
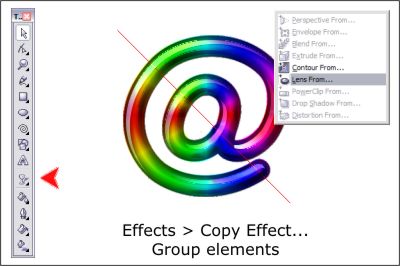
(Figure 27) Copy the lens effect to the other shapes and adjust the center and diameter of the transparency. Group all the reflection elements. Save your work and take a short eye break. We're almost done.
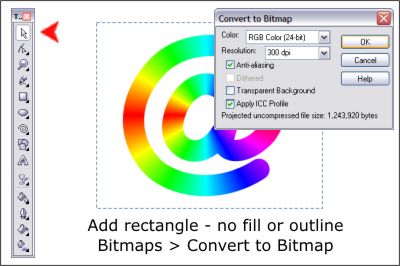
(Figure 28) Locate the other duplicate you made of the vector @ shape. CorelDRAW a rectangle around the @ to the size shown. Set the fill and outline to none.
Select both the rectangle and the rainbow-filled @. Convert these to Bitmap but do not select the Transparent Background option.
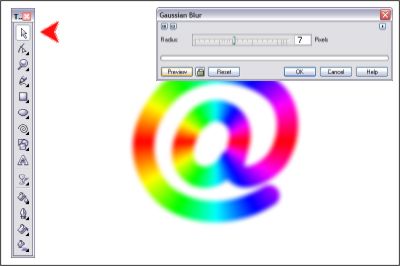
(Figure 29) With the bitmap selected, select Bitmaps > Blur > Gaussian. Apply a 7 pixel Gaussian Blur.
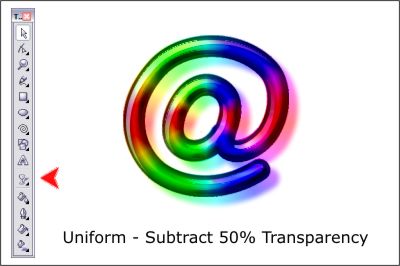
(Figure 30) Position the blurred bitmap over the other elements. Apply a Uniform, Subtract 50% Transparency. Move the blurred bitmap until the shape appears to the right and down from the shapes beneath it.
If the @ were indeed filled with rainbow-colored GEL and we placed the @ on a white sheet of paper and let light shine though it, we would get the same diffused color effect as we have achieved by placing the transparent blurred bitmap on top.

1. Preparation
2. Drawing the background
3. Working with multiple pages and backgrounds
4. Drawing a starburst offer symbol
5. Drawing a lightbulb
6. Converting a drawing into a silhouette
7. Adding photos in random and standardised sizes
8. Creating text areas and defining style templates
9. Preparing the brochure for print
In this tutorial you will learn how to create an 8 page brochure, from idea to publishing. The company behind the brochure only exists in this tutorial. Any similarity with existing companies is not intended. The company sells gifts on the Internet and plans to use the brochure to drive traffic to the website. The general idea is to create the illusion of an entrance to a shop that is open 24/7. The brochure also includes a monthly offer and tips on how to get ideas for gifts. The design involves the collection of several photos of the products, the drawing of the entrance door, an offer-symbol, and a light bulb to illustrate the generation of ideas.
The first step is to collect all your images in a folder and then make sure that they are all in the CMYK colour mode, which is the mode that is used for professional printing.
All the images are now ready for the printing process. As a later check you can always get information about the colour mode when you click on an image in CorelDRAW X3. You can then see the information about the image in the Status Bar at the bottom of the screen.
If the image is in RGB bitmap mode, select the Bitmap-menu | Mode | CMYK Colour. The second step is to draw the graphics:
2. Drawing the background (a door)
The door will look like a modern, simple metallic door with glass. Open CorelDRAW X3. Start by setting up the page size:
The document will be a handy size, a little wider than an A5 page.


This drawing of the door will be used as a basis for all the following 7 pages, but in slightly different ways.
3. Working with multiple pages and backgrounds

The second page will have the metal background only.
Page 3 will have almost the same background, but as this page will contain text that might be difficult to read, you must maintain the middle rectangle. So copy all rectangles from page 1 and paste them on page 3. Delete the top rectangle and apply a white colour to the remaining middle rectangle.


Now you have created the basic layout of the brochure and only need to add content to the pages, which can consist of product pictures, informative text and graphic elements.
4. Drawing a starburst offer symbol
In this section, you will learn how to create a starburst symbol, which will be used on page 2:

How to create the starburst symbol:


Now we will create the light bulb to illustrate the generation of ideas.
Creating the light bulb:


6. Converting a drawing into a silhouette

Use this silhouette in different places in the brochure.
The basic elements are now in place. You just need to add photos and text to finish the brochure.
7. Adding photos in random and standardised sizes
You can add photos in different ways:
On page 2 we will add images of random sizes.

On page 1, 4, 5, 6 and 7 the photos will be placed in equal sizes. The easiest way to do this is to place the photos in placeholders:


8. Creating text areas and defining style templates
There are two ways to insert text in CorelDRAW: Artistic and Paragraph text.
You can create Artistic text by clicking somewhere on the page with the Text Tool. This is mostly for headlines or single lined text like on the front page and back page of the brochure.
You can edit the text like in all other programs by selecting the text and editing the font, the size etc. in the Property Bar.

When you need multi lined text you must drag the Text Tool across the page, and you will create a placeholder for Paragraph text.
Or you can draw a rectangle of a specific size, and then click inside the rectangle with the Text Tool.
On page 3, the text container has a size of 145 x 160 mm. This container should have 2 columns in the text to make it easy to read. The light bulb is placed inside the text, with the text floating around the bulb.
Two column text


The text on page 4, 5, 6 and 7 contains product descriptions.

In order to maintain a common look in your marketing materials, it is a good idea to create standard text styles that can be reused. In the product description we have used 4 styles: a headline, body text, paragraph header, bullets and a price style.
To define these styles, select the Window menu | Dockers | Graphics and Text Styles. One of the many dockers appears to the right of the document.

The docker already contains several styles. You apply a style to the text by first selecting the paragraph with the Text Tool, and then by double clicking the appropriate style.
To define a new style, you can right click in the white area of the docker, and then select New | Paragraph Text style. Immediately hereafter you can change the name of the style.
To change the look of the style right click the new style and then select Properties in the list of choices.

Make sure to select the new style, before you click the first Edit button. Now a dialog box opens.

Under the Character tab you can change the look of the characters, e.g. font, size and style.
Under the Paragraph tab you can change the appearance of the whole paragraph, e.g. alignment, spacing between paragraphs and indents.
In the “Effects” area, you can define bulleted text by selecting “Bullet” in the Effect Type dropdown.
To save the style as a template, you must right click in the docker once more, select Template | Save as, and you are now able to place this style file on your computer or the company intranet. To use the style, your colleagues need to load the template into their documents.
9. Preparing the brochure for print
The first times you send your brochure to a service bureau, it is propably best to let the people there do the prepress work for you.


